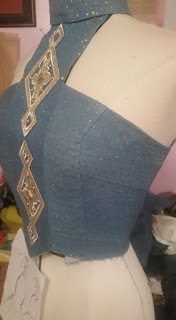
Denim Formal in the Making
Sew Much Talent's Thrift Store Refashion challenge is nearing the end. Monday,
October 31st, to be exact. I am in the 11th hour, but I feel I have that proverbial second wind. I can literally see my design taking shape,and I'm loving it!!
Okay, for those of you that may not follow me on Facebook, Instagram, or Periscope, may be in the dark about the SMT Refashion challenge. No problem. Each month many sewist and crafters engage in the designated challenge for that particular month. It could be DIY ANYTHING from, jewelry, crafts, and mostly sewing something. Many of my Sew Much Talent buddies and Pericrafters participate. At the end of each challenge we give away two prizes that are sponsored by other businesses or crafters in our close knit community. Although some of you may be familiar with the challenges that Sew Much Talent has hosted, this year was the first year that the challenges have run consistently each month. I can thank Periscope for that. That's a whole other topic for a scope coming soon.
Anyway, I want to get back to the challenge at hand, October's Thrift Store challenge. What's that? Well, I mentioned it briefly in my previous scope. So, you gotta go back and read it. Let's just say, I followed directions and now I"m executing my design,.I promised to blog, scope, and share pictures of the process and progress of bringing my denim formal gown design to life.
This is a somewhat new(er) venture for me. I have many designs, and I've brought several to life through the franken pattern method. Remind me to talk about that later. However, this is my second real attempt to bring one of my designs to life from inception. This challenge is pulling me in a direction that I have been "planning "to step in for a minute. Sometimes we just need a little boost.
Speaking of, that's the purpose of these challenges is for us to do things we haven't done before or stretch and push to do what we have planned to do. There is so much talent all around. So, I would love to see much talent realized.
Without further delay, here are some pictures to show my progress since my last post...
Original Design
Last post you saw where I used my "draping tape" to map out my design on my manny. I even gave you a sneak peek at how I wanted to put it together. For the most part things are the same, there are subtle changes. So, I'll pick up there. I have since created pattern pieces for the upper bodice...center front, side fronts, and back using fusible interfacing. Also, the neck band. Then, I decided to created the entire upper bodices out of the gold dotted fabric from the bomber jacket. After all fabric pieces were cut and fused, I stitched them together. I will not be lining the bodice at this time. This will be more or less a sample dress. I have made subtle design changes from my original thoughts. I will not be using the gold lurex sweater or the gold scarf for this design. But, I will be using it since it is pat of my $25 budget. Stay tuned for more on that. Also, as you can see in the illustration above, the back has straps. I've decided to use what would have been the straps in a more decorative detail down the center front of the bodice. I can 't wait to see the end...almost there!!
Next step is to work on the upper skirt. Since I have $3 balance on my thrift store purchase, I need to go and look for a zipper to use.
That's it folks. You're just gonna have to come back and follow up, get updates for this project. Until then, peace and blessings! #Love you to life!
Alethia


This is going to be a masterpiece.
ReplyDeleteAmen!!!
DeleteThank you Faye!
DeleteThis is beautifull. Can you say AYH Designs Signature Collection? Yes ....collection
ReplyDeleteYes!!!
DeleteGreat reading yyour blog
ReplyDelete